

How to use Alpine.js with Rails and Turbo
For apps not needing Stimulus.js and just using Turbo, the Alpine.js framework offers the right amount of JavaScript to make your apps sparkle.


Alpine.js is one of my favorite JavaScript libraries. It is simple, fast, and easy to integrate without writing too much JavaScript code.
For Ruby on Rails applications where I'll be doing most of the rendering server-side, such as through Turbo, and where I don't want to use React or Vue.js (or even Stimulus), Alpine.js offers the right amount of JavaScript.
In this tutorial, we'll go over how to use Alpine.js with your Rails app, and how to add the following UI elements:
Flash messages (auto disappear)
Modal
These are standard UI elements you would find in any modern day web application, and I want to show you how we might implement them while keeping in mind Rails conventions.
But first, if you haven't heard of Alpine.js before, here's a very quick introduction. Feel free to skip the first section if you already know about it.
A quick introduction to Alpine.js
Alpine.js describes itself as Your new, lightweight, JavaScript framework.
For folks who have used AngularJS or Vue.js, you should feel right at home as Alpine.js allows you to add behavior to HTML elements as part of its attributes.
It's best to show with an example, so here we go...
<script src="//unpkg.com/alpinejs"></script>

<div x-data="{ open: false }">
  <button x-on:click="open = ! open">Toggle</button>
  <span x-show="open">I'm here!</span>
</div>
Here is the CodePen so you can play around with it:
If you haven't seen this before or worked with other JavaScript frameworks that embed data as part of the HTML element attributes, the syntax may look a bit unusual.
However, the beauty of all of this is that there's no additional JavaScript code you're writing elsewhere. You're not adding event handlers manually, for instance. You can declare how elements respond to user-initiated events, and alter the data state accordingly. Other elements can reference these data objects and, in turn, adjust their elements.
Why use Alpine.js with Ruby on Rails at all?
Let's talk about the kind of scenarios where Alpine.js is not a good fit for Rails. Specifically, I'm thinking about more intensive JavaScript apps where Stimulus (or other JavaScript frameworks) may be the better choice.
The question I usually ask myself is: Where is the rendering performed? If the rendering is primarily performed on the client side, then Alpine.js may be redundant as I’m already handling it with some other library. And in these libraries, I’m typically maintaining the state in some way. Intermingling multiple libraries to handle state just complicates things.
However, if we're primarily sticking with server-side rendering, we can skip Stimulus altogether.
Specifically, if I'm building an application where I know I'll be leveraging Turbo and all the powers of server-side rendering (and therefore won't need to do a bunch of fetch calls with JavaScript and doing its own rendering), then Alpine.js adds the right amount of punch to make the UI come to life.
I’d like to mention some folks prefer not to conflate their HTML markup with JavaScript-related code and data (or even CSS styling for that matter). A lot of programming revolves around the organization of logical components and ensuring the maintainability of such components. Having seen inside the codebases of some very large companies, I don't think such dogmatic ideals exist in practice. Alpine.js' usage within the existing HTML mark up isn't so bad based on my experience.
Our demonstration application
I’ve already set up a demonstration application for you, so you have a Rails codebase to reference.
The repository is at https://github.com/Code-With-Rails/alpinejs-demo.
All screenshots and code examples are taken from that app. The application also uses Tailwind CSS to help with styling.
What we will build
In this post, we will go over several types of UI interactive elements that typically require JavaScript libraries.
Given that our pages will primarily be server-side rendered, our application should still function (although a bit less interactive).
Specifically, these are the UI interactions:
Flash messages (auto disappear)
Modal
These interactive elements typically need JavaScript, and so our goal here is to be able to enhance our application’s screen with Alpine.js’ data attribute syntax only without adding any custom JavaScript.
Installation of Alpine.js with Rails
For our base application, we will be using Rails 7 which supports import maps. If you’re not familiar with import maps or have not tried it yet, this is a great chance to do so.
Importmap allows us to manage third-party JavaScript dependencies without the use of Webpacker and other tools
Let’s first generate a new Rails application with the usual bin/rails new:
bin/rails new rails-alpinejs-demo
cd into the root of your app directory, and type:
bin/rails importmap:install
bin/importmap pin alpinejs
The first command (bin/rails importmap:install) will install Importmap into your codebase. It shows the following when you run that command:
Add Importmap include tags in application layout
      insert  app/views/layouts/application.html.erb
Create application.js module as entrypoint
      create  app/javascript/application.js
Use vendor/javascript for downloaded pins
      create  vendor/javascript
      create  vendor/javascript/.keep
Ensure JavaScript files are in the Sprocket manifest
      append  app/assets/config/manifest.js
Configure importmap paths in config/importmap.rb
      create  config/importmap.rb
Copying binstub
      create  bin/importmap
For the second command, we "pin" the Alpine.js library. You will notice that this adds an entry into config/importmap.rb :
pin 'alpinejs', to: 'https://ga.jspm.io/npm:alpinejs@3.10.5/dist/module.esm.js'
Whenever Rails sees something like import Alpine from 'alpinejs' in our codebase, it will convert it to import Alpine from https://ga.jspm.io/npm:alpinejs@3.10.5/dist/module.esm.js . One last thing before we move on: If you change any of the pins (eg. bin/importmap pin ...), remember to restart your development Rails server to pick up the changes.
To get Alpine.js to work with Turbo (which is important because Turbo and Rails already work really well together), we'll need to add a slight adapter library. The reason for this is that Alpine.js adds event handling automatically based on your HTML markup. When Turbo refreshes a page, there needs to be a clean up of these event handlers. We could add code to do this ourselves, but luckily someone already created such a library to handle this for us.
To add this adapter to help us clean up event handlers, pin the library like so:
bin/importmap pin alpine-turbo-drive-adapter
Finally, let's set up Turbo. The turbo-rails gem should already be in your Gemfile. So let's run the install command as described in the gem's README:
bin/rails turbo:install
bin/rails turbo:install:redis
Note: You may need to run
bundle installone more time after this previous step as Redis is added as a dependency. If you're using our demo repository, you should have everything set up already (including Redis as a service).
Examining our config/importmap.rb file, we should see the following:
# Pin npm packages by running ./bin/importmap

pin 'application', preload: true
pin 'alpinejs', to: 'https://ga.jspm.io/npm:alpinejs@3.10.5/dist/module.esm.js'
pin 'alpine-turbo-drive-adapter', to: 'https://ga.jspm.io/npm:alpine-turbo-drive-adapter@2.0.0/dist/alpine-turbo-drive-adapter.esm.js'
pin '@hotwired/turbo-rails", to: "turbo.min.js', preload: true
To complete the setup, we need to add the following code to our application.js to initialize Alpine.js.
// Configure your import map in config/importmap.rb. Read more: https://github.com/rails/importmap-rails

import '@hotwired/turbo-rails'
import 'alpine-turbo-drive-adapter'
import Alpine from 'alpinejs'

window.Alpine = Alpine
Alpine.start()
We see here that we've imported turbo-rails, our Alpine.js adapter for handling event clean up, and our Alpine.js library itself. Finally, we initialize Alpine.js with Alpine.start().
Note: You can, of course, do this on a per-page basis — ie. only on the pages you want Alpine.js to be active. This might be helpful in circumstances where you’re using multiple JavaScript libraries and only want Alpine.js to be active on specific pages.
We’ll create a HomeController with a single index action. This will be the starting point for all the things that we’ll be building. We’ll skip adding the helpers and other files as we won’t need them for our app.
bin/rails g controller Home index --no-helper --skip-routes
Replace config/routes.rb with the following:
# config/routes.rb
Rails.application.routes.draw do
  root to: 'home#index'
end
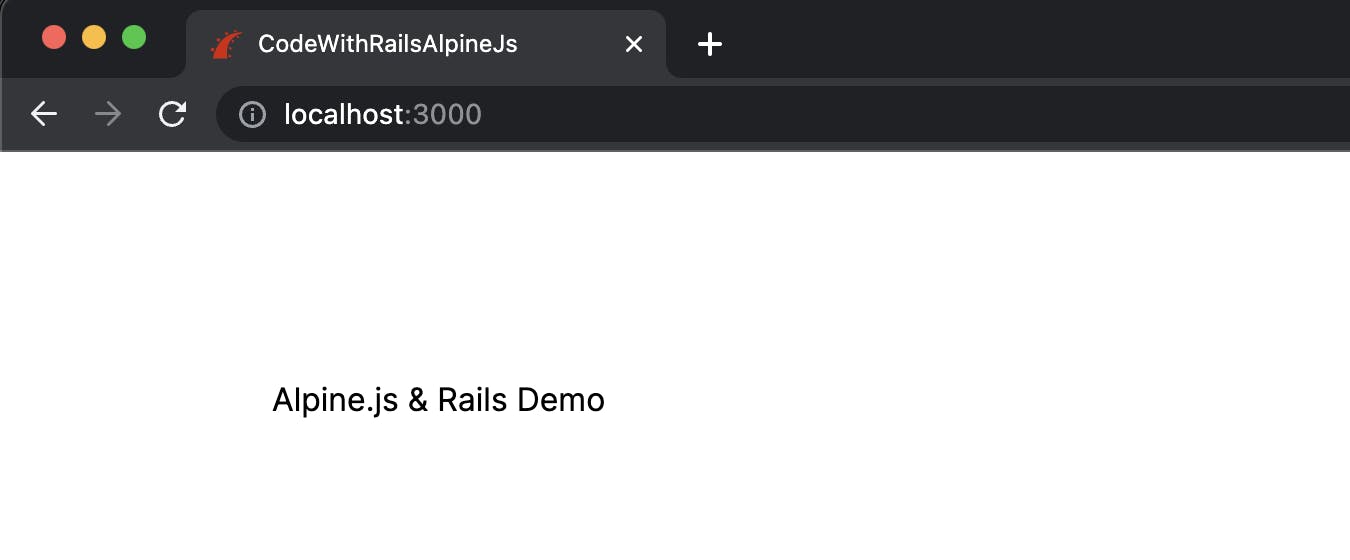
# app/views/home/index.html.erb
<p>Alpine.js & Rails Demo</p>
To verify everything works, boot up your application with bin/rails server and go to http://localhost:3000. You should see the following screen:
You can verify that Alpine.js is loaded by opening up DevTools in Chrome and typing Alpine into the console:
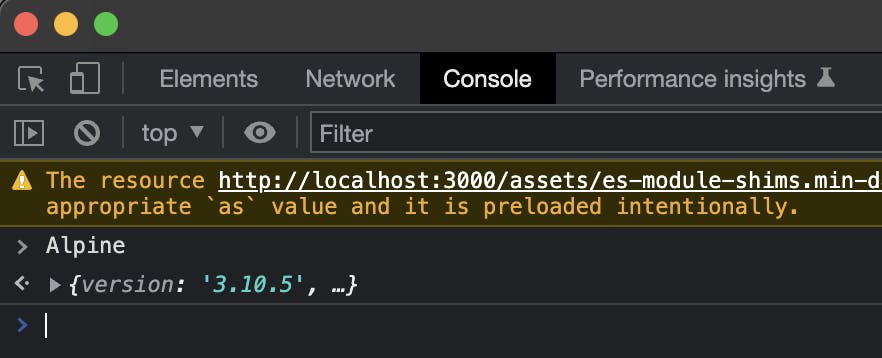
You should see the version of Alpine.js that is loaded, as we've assigned the variable Alpine to window.Alpine in the previous step.
Congrats! The codebase is now ready for us to build some interactive UI elements with Alpine.js.
Note: Before we begin, I want to point you to the documentation pages for Alpine.js at alpinejs.dev/start-here. It has all the API references you’ll need (and much more). It's always helpful to keep the docs handy. It's clear and well written and should help you understand what Alpine.js offers.
Building flash messages
Flash messages are very common in all types of apps. Rails has very good support right out of the box for its own flash object. Let us see how we can incorporate Rails conventions here with Alpine.js to display flash messages easily.
The requirement here will be to ensure that flash messages are:
Can auto disappear
Automatically renders regardless if it’s on a new page load or from a Turbo Stream
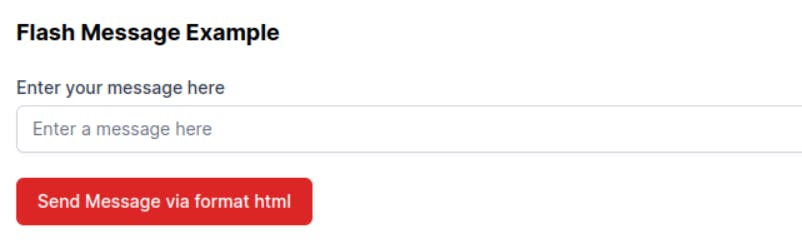
To trigger flash messages, we will start off with a simple form that sends a custom message to a controller. Our controller will respond with a classic redirect and will display a message.
Here's the form we will build:
# app/views/home/index.html.erb
<%= turbo_frame_tag 'flash-message-form-html', target: '_top' do %>
  <%= form_with url: flash_message_path, method: :post do |f| %>
    <div class="my-5">
      <%= f.label :message, 'Enter your message here', class: "block text-sm font-medium text-gray-700" %>
      <div class="mt-1">
        <%= f.text_field :message, class: "block w-full rounded-md border-gray-300 shadow-sm focus:border-red-500 focus:ring-red-500 sm:text-sm", placeholder: 'Enter a message here' %>
      </div>
    </div>
    <%= button_tag "Send Message via HTML", type: 'submit', class: 'inline-flex w-full justify-center rounded-md border border-transparent bg-red-600 px-4 py-2 text-base font-medium text-white shadow-sm hover:bg-red-700 focus:outline-none focus:ring-2 focus:ring-red-500 focus:ring-offset-2 sm:w-auto sm:text-sm' %>
  <% end %>
<% end %>
You will notice that we've wrapped the above form in a turbo_frame_tag. We're using Rails 7 in our current example, and the default behaviour when using Turbo is that form submissions are sent as Turbo Stream requests.
Here, you see that we've specified the target as _top. This is done intentionally to ensure that once the request is handled by the controller that a full page redirect is performed. You will see in the next example when we use Turbo Stream exclusively to submit this form that we leave out the target hash option.
For the controller, we create a controller to handle setting the flash object.
bin/rails g controller FlashMessage new create --no-helper --skip-routes
Here's the code for this:
# app/controllers/flash_message_controller.rb
class FlashMessageController < ApplicationController
  def create
    respond_to do |format|
      format.html { redirect_to root_path, notice: params[:message] }
    end
  end
end
And in the routes:
# config/routes.rb
resource :flash_message, controller: 'flash_message', only: %i[create]
Here, the controller is pretty simple. POST requests are handled by the controller's create action. We explicitly specify that this endpoint will handle HTML formats.
Heading back to localhost:3000, you should be able to submit the form. However, no flash message will be shown yet because we have not yet added the code needed for this.
Remember that we want the flash message code to handle both full page loads (eg. in a form submission where it redirects to a full page reload) and with Turbo Stream requests.
First, let's add this to application.html.erb, our application's layout file. Usually, I'd add this somewhere near the bottom out of the way of the rest of the markup:
# app/views/layouts/application.html.erb
<%= render 'layouts/flash_wrapper' %>
We will need to create the partial layouts/_flash_wrapper.html.erb now:
# app/views/layouts/_flash_wrapper.html.erb
<div class="fixed inset-0 flex items-center justify-center px-4 py-6 pointer-events-none sm:p-6 sm:items-start sm:justify-center z-50"
     x-data="{ flashShown: false }"
     x-show="flashShown"
     x-cloak
     x-transition:enter="transition ease-out duration-300"
     x-transition:enter-start="opacity-0"
     x-transition:enter-end="opacity-100"
     x-transition:leave="transition ease-out duration-200"
     x-transition:leave-start="opacity-100"
     x-transition:leave-end="opacity-0">
  <div class="max-w-xs w-full bg-slate-900 p-4 text-slate-100 font-bold text-center shadow-lg pointer-events-auto rounded-md shadow-xs overflow-hidden">
    <%= render 'layouts/flash_message' %>
  </div>
</div>
This code looks scary, but it's simpler than it appears. Ignore the class attributes, as those are primarily Tailwind CSS classes to help with the styling and positioning of the flash message HTML element.
The Alpine.js directives are the ones that have the format of x-[directive].
Here, we describe the initial state in x-data. Within this, we specify flashShown as being false. You can think of this like it is a local variable in JavaScript.
The next line is important, as it tells Alpine.js when to show or hide this element. You will see that x-show is set to only be true when flashShown is truthy.
The next line with x-cloak is a CSS pseudo selector that Alpine.js recommends to hide the element (with the help of some custom CSS) so that we can avoid the situation where this element displays before Alpine.js has had a chance to initialize. This is not strictly needed, but it's here to give the UI a nice professional look. You can read more about it at alpinejs.dev/directives/cloak.
The next few lines that begin with x-transition- tells Alpine.js what CSS classes to add throughout the "transition" life cycle when the element is shown or hidden. You can read more about it at alpinejs.dev/directives/transition, but essentially this is useful for adding effects like fade in/out, translation movements, and other similar transition effects via CSS.
Finally, you'll see here we'll be rendering another partial within this partial: layouts/_flash_message.html.erb. Let's create that file now as well:
<%= turbo_frame_tag 'flash' do %>
  <% unless flash[:notice].blank? %>
    <div x-init="() => { flashShown = true; setTimeout(() => { flashShown = false }, 4000) };">
      <%= flash[:notice] %>
    </div>
  <% end %>
<% end %>
Note: I've simplified this code to only handle the flash[:notice] value for this tutorial, but you should get the idea on how to expand this code to handle other types of flash messages.
There is a good reason why I've separated the flash message from the flash wrapper. The reason is that later on when we create the Turbo Stream version to render flash messages, we can simply update this Turbo Frame.
Let's go through line-by-line what this snippet of code does.
First, we see that we've wrapped the whole snippet in a
turbo_frame_tagwith anidofflash. This is done on purpose as we'll need to reference this part of the code later when we use Turbo Stream to update the flash message. For now, you can ignore this.Next, we add an
unlessconditional to skip this whole piece of code if no flash message is present.On the third line, we see yet another Alpine.js directive:
x-init.
Let's try this out by submitting a message:
Enter a message in the input box, and click Send Message.
The FlashMessageController#create action should process this POST from the form, read the params[:message] and set it as the flash once redirected back to the root_path.

Now, let's implement a version of this where our application can respond with a Turbo Stream and be able to display flash messages.
Note: The reason we want our flash code to be able to handle both HTML and Turbo Stream responses is that a typical Rails app is likely to incorporate both types of requests.
To start, our form needs to be modified to look like the following:
# app/views/home/index.html.erb
<%= turbo_frame_tag 'flash-message-form' do %>
  <%= form_with url: flash_message_path, method: :post do |f| %>
    <%= f.label :message, 'Enter your message here' %>
    <%= f.text_field :message, placeholder: 'Enter a message here' %>
    <%= button_tag "Send Message via Turbo Stream", type: 'submit' %>
  <% end %>
<% end %>
Note that in our demo repo, we've modified our code to be able to incorporate both types. However, for simplification, I've only shown you the code snippet without the refactoring.
Let's take a look at the difference between this above form and the one we built before.
You will notice that we removed the target tag from the turbo_frame_tag. When we submit our form, we will instruct our Turbo Stream response to reset the form. By omitting the target tag, we will be able to accomplish this.
Other than that major difference, there isn't any other things to note.
Next, we will need to modify the controller code at FlashMessagesController:
# app/controllers/flash_message_controller.rb
class FlashMessageController < ApplicationController
  def create
    respond_to do |format|
      format.html { redirect_to root_path, notice: params[:message] }
      format.turbo_stream { flash.now[:notice] = params[:message] }
    end
  end
end
Similar to the format.html, we set the flash's object value to params[:message. In this case, we set it via flash.now so that the object's value does not persist to the next request.
And that's it. Let's test it out:
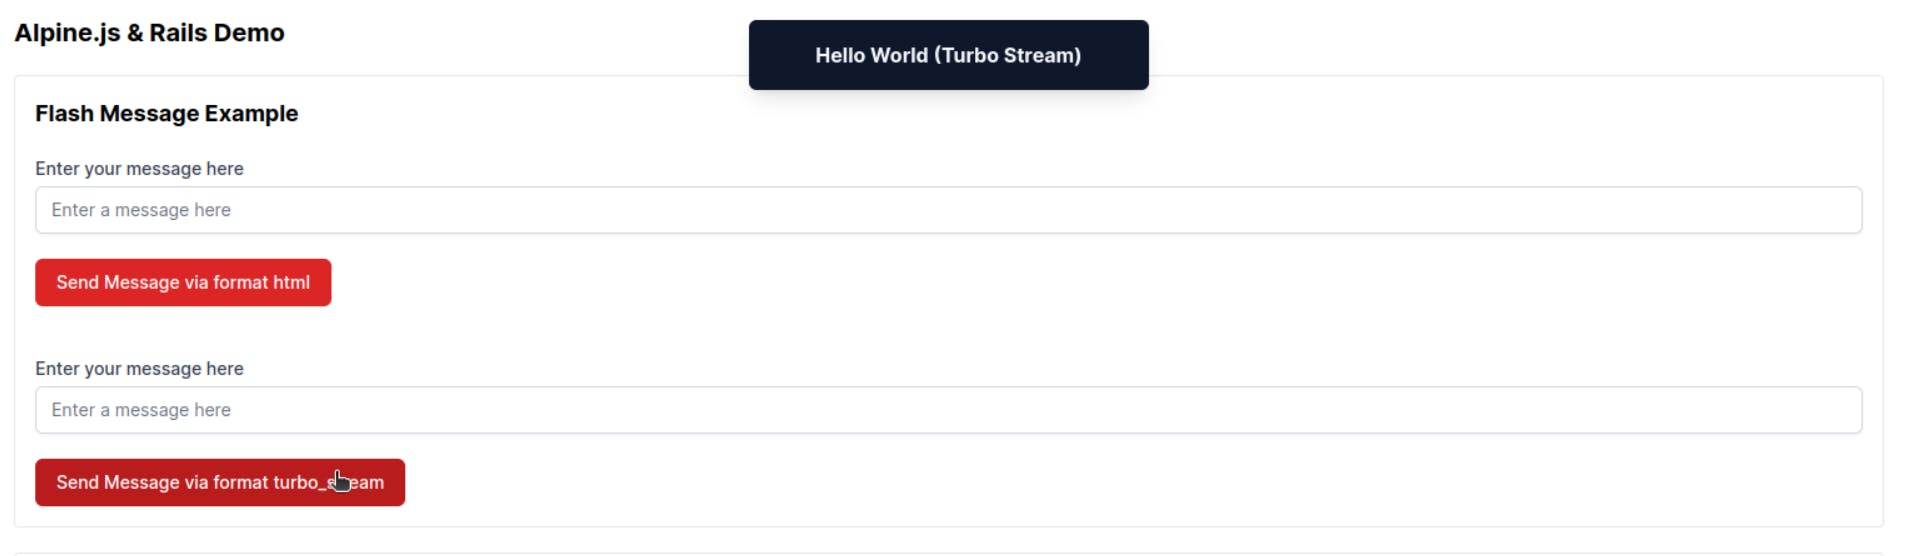
We see a flash message being displayed. Just to verify that this is a full Turbo Stream response, let's take a look at our logs:

As you can see, we can see the message Processing by FlashMessageController#create as TURBO_STREAM and also Rendered flash_message/create.turbo_stream.erb (Duration: 4.1ms | Allocations: 1864) in the log output.
Next, let's take a look at how we would build a modal with Alpine.js and using Rails conventions.
Building a modal
In this next demo, we will build a modal, but with very specific requirements. Our modal will be triggered by a button. The button will call out to a new controller action (eg. ModalController#new), and this will return a Turbo Stream response. The modal itself will contain a form which itself sends a POST request when the form is submitted. This POST request is processed by Rails as a Turbo Stream request.
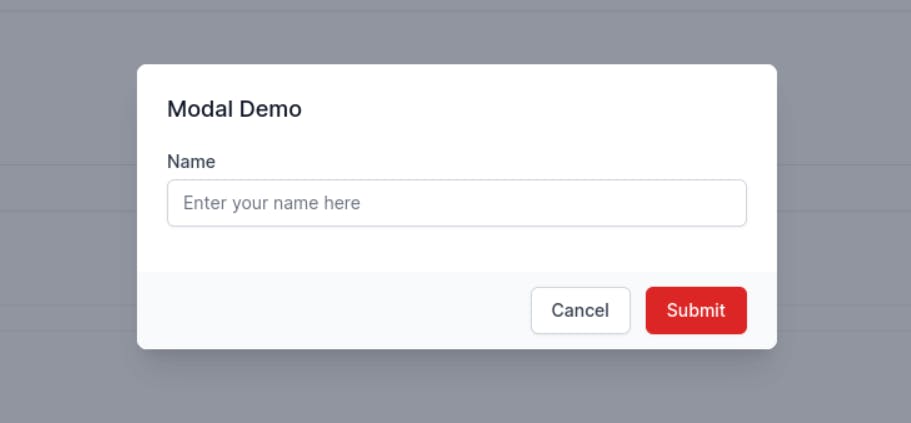
Some other UI-specific requirements are that the modal will automatically close after the form is successfully submitted. If the form is invalid, errors will be displayed and the modal does not automatically close. Finally, if we press the ESC key, the modal will close.
Here’s a screenshot of the final product:

Let’s start by creating a simple link that triggers our modal:
# app/views/home/index.html.erb
<%= button_to 'Open Modal', new_modal_path, params: { format: :turbo_stream }, method: :get %>
Notice in the code snippet above we are using the button_to helper that is provided by Rails.
Let’s quickly add another controller to handle the modal interactions:
bin/rails g controller Modal new create --no-helper --skip-routes
We create two actions here. The new action will be used to trigger the opening of the modal. The create action is used when we submit a form that is within the modal.
class ModalController < ApplicationController
  def new
    @user = User.new
    respond_to do |format|
      format.turbo_stream
    end
  end

  def create
    @user = User.new(user_params)
    respond_to do |format|
      format.turbo_stream do
        if @user.save
          redirect_to root_path, notice: "#{@user.name} added"
        else
          render 'new', status: :unprocessable_entity
        end
      end
    end
  end

  private

  def user_params
    params.require(:user).permit(:name)
  end
end
The above controller code is a fairly standard Rails controller form. We aren't going to do anything fancy. The create action simply adds a User record into the database, and the new action instantiates a @user object which we will reference in the form itself.
Because we’re leveraging Turbo for this, we will be loading the modal via Turbo Frames when we call on the ModalController#new action.
If you’re not familiar with Turbo Frames, it essentially allows us to replace certain parts of our HTML page with a server-side response (ie. rendered from the server). You can read more about Turbo Frames at turbo.hotwired.dev/handbook/frames.
By the way, you will notice that we haven’t yet touched Alpine.js so far in the building of our modal. This is intentional, as we’re trying to do as much as possible with plain vanilla Rails.
We will also need to update our config/routes.rb file with this new controller endpoint:
Rails.application.routes.draw do
  # ... other code
  resource :modal, controller: 'modal', only: %i[new create]
  root to: 'home#index'
end
Running bin/rails routes, you should now see the following:
  Prefix Verb    URI Pattern                     Controller#Action
new_modal GET    /modal/new(.:format)            modal#new
   modal POST    /modal(.:format)                modal#create
   root GET      /
# Rest of the routes omitted
Let's update our app/views/home/index.html.erb file so that our button_for
In the app/views/modal/new.html.erb file, let’s copy and paste the following code. This is the HTML code for the modal itself:
<%= turbo_stream.update 'modal-placeholder' do %>
  <%= turbo_frame_tag 'example-form', target: '_top' do %>
    <%= render 'form' %>
  <% end %>
<% end %>
In the above code, you will notice that in addition to the HTML code, we have also added a turbo_stream.update call.
Turbo comes with several methods (see github.com/hotwired/turbo-rails/blob/v1.3.2..) that allow developers to modify the DOM in the Turbo Stream response from the controller.
In this case, we want to update our modal placeholder, which we will now create.
Here's the code snippet for the new.html.erb file, which contains our:
Modal
Form input
Error message handling
CSS transitions
<div class="relative z-10" aria-labelledby="modal-title" role="dialog" aria-modal="true" x-init="$nextTick(() => { isModalOpen = true })" x-show="isModalOpen">
  <div class="fixed inset-0 bg-gray-500 bg-opacity-75 transition-opacity"
       x-show="isModalOpen"
       x-transition:enter="ease-out duration-300"
       x-transition:enter-start="opacity-0"
       x-transition:enter-end="opacity-100"
       x-transition:leave="ease-in duration-200"
       x-transition:leave-start="opacity-100"
       x-transition:leave-end="opacity-0">
  </div>

  <%= form_with model: @user, url: modal_path, method: :post do |f| %>
    <div class="fixed inset-0 z-10 overflow-y-auto">
      <div class="flex min-h-full items-end justify-center p-4 text-center sm:items-center sm:p-0">
        <div class="relative transform overflow-hidden rounded-lg bg-white text-left shadow-xl transition-all sm:my-8 sm:w-full sm:max-w-lg"
             x-show="isModalOpen"
             x-transition:enter="ease-out duration-300"
             x-transition:enter-start="opacity-0 translate-y-4 sm:translate-y-0 sm:scale-95"
             x-transition:enter-end="opacity-100 translate-y-0 sm:scale-100"
             x-transition:leave="ease-in duration-200"
             x-transition:leave-start="opacity-100 translate-y-0 sm:scale-100"
             x-transition:leave-end="opacity-0 translate-y-4 sm:translate-y-0 sm:scale-95">
          <div class="bg-white px-4 pt-5 pb-4 sm:p-6 sm:pb-4">
            <div class="sm:flex sm:items-start">
              <div class="mt-3 text-center sm:mt-0 sm:text-left w-full">
                <h3 class="text-lg font-medium leading-6 text-gray-900" id="modal-title">Modal Demo</h3>
                <div class="my-5">
                  <%= f.label :name, 'Name', class: "block text-sm font-medium text-gray-700 #{@user.errors[:name].any? ? 'text-red-700' : nil}" %>
                  <div class="mt-1">
                    <%= f.text_field :name, class: "block w-full rounded-md border-gray-300 shadow-sm focus:border-red-500 focus:ring-red-500 sm:text-sm #{@user.errors[:name].any? ? 'border-red-600' : nil}", placeholder: 'Enter your name here' %>
                  </div>
                  <% unless @user.errors[:name].blank? %>
                    <p class="text-red-600 text-sm font-medium my-2">
                      <%= @user.errors.full_messages_for(:name).join(', ') %>
                    </p>
                  <% end %>
                </div>
              </div>
            </div>
          </div>
          <div class="bg-gray-50 px-4 py-3 sm:flex sm:flex-row-reverse sm:px-6">
            <%= button_tag 'Submit', type: 'submit', class: 'inline-flex w-full justify-center rounded-md border border-transparent bg-red-600 px-4 py-2 text-base font-medium text-white shadow-sm hover:bg-red-700 focus:outline-none focus:ring-2 focus:ring-red-500 focus:ring-offset-2 sm:ml-3 sm:w-auto sm:text-sm' %>
            <%= button_tag 'Cancel', type: 'button', class: 'mt-3 inline-flex w-full justify-center rounded-md border border-gray-300 bg-white px-4 py-2 text-base font-medium text-gray-700 shadow-sm hover:bg-gray-50 focus:outline-none focus:ring-2 focus:ring-red-500 focus:ring-offset-2 sm:mt-0 sm:ml-3 sm:w-auto sm:text-sm', :@click => 'isModalOpen = false' %>
          </div>
        </div>
      </div>
    </div>
  <% end %>
</div>
Let's go over this piece of code in detail so we can understand what's happening.
Unlike the other code samples in this tutorial, I've left the CSS classes here as some of the CSS transitions simply won't make sense if I provided a simplified version.
On the first line, you see the following code in the attributes:
x-init="$nextTick(() => { isModalOpen = true })" x-show="isModalOpen"
What will happen is that when new.html.erb is rendered as a turbo_stream.update into our target Turbo Frame, Alpine.js will pick up on this piece of code and will set isModalOpen as true. This will cause this modal mark up to be displayed.
The x-init tells Alpine.js to call the JavaScript code within here once it picks up this element. You will notice that there is a $nextTick function here. This tells Alpine.js to only execute this after it has registered all the elements. If you think of how a browser engine evalutes the JavaScript code, $nextTick can be thought of as deferring the specified command until the next time around.
Note: If you get a chance to try out the code, remove the $nextTicket to see what happens. You will notice that the modal does not function quite as expected. This is because the code executes too soon -- before all the elements have had time to get set up.
Finally, we see an x-show directive similar to what you've seen before where if the variable evaluates to true then the element (and all its children elements) will be displayed.
On the next line, we again see a bunch of x-show and x-transition directives similar to before. I won't go into details this time, but these directives function the same way as I described them for the flash message part of this tutorial. This part of the code is for the background that is shown when the modal is visible.
The next part of the code shows the actual modal itself. Again, along with the form code, we see a bunch of Alpine.js directives of x-show and x-transition.
I want to draw your attention (ignore the Tailwind CSS utility classes) to the fact that the form is a standard Rails form. There is nothing fancy or special here. In fact, there is essentially nothing Alpine.js specific.
You can predict that when this form is submitted, it will be submitted as a Turbo request, and the response will be a Turbo Stream.
We're almost ready to give our modal a try. However, if you try to click on the Open Modal button we created earlier, it will not work yet. What we need is a “target” HTML element into which Turbo can render our modal.
Typically, because I only want one modal to be opened at any point in time, I use a single placeholder. This helps avoid the situation where multiple modals are shown.
In my application.html.erb layout file, we can add before the closing body tag:
# app/layouts/application.html.erb - before the ending </body> tag
<%= turbo_frame_tag 'modal-placeholder' %>
In our demo code, we have placed the above turbo_frame_tag right below our button. The important thing here is to ensure that your page only has one single tag with the ID (in this case modal-placeholder).
Now, when we click on the Open Modal button, the controller at ModalController#new will respond with a Turbo Stream and replace the content within the placeholder.
If we enter a name here, you can see that the record is saved, as seen in the log output below:

And because we've hooked up our flash handling code already, when the form is submitted, a flash message is set and will automatically be displayed.
Conclusion: Alpine.js & Turbo may be enough
I have built complicated user interfaces with Stimulus. Inevitably, the JavaScript codebase (like most complicated JS apps and how they evolve) end up quite big and hard to organize. For myself, this was the reason I picked Alpine.js.
Alpine.js allows me to focus on server-side rendering and minimize the amount of JavaScript code I need. When I use Alpine.js and work within what it is designed for (small lightweight interactions that require JS), my app and its codebase feel more lightweight.
Having said that, is Alpine.js right for you? I think at the end of the day, it will come down to your personal preference in terms of syntax. I know more than a few Rails colleagues who wouldn't use anything but Stimulus because they're very much used to it.
My personal preference is that I don't prefer to use a lot of JavaScript anyway. And with this, I prefer not to have a separate JavaScript folder with a bunch of Stimulus controllers. Instead, I prefer to organize my views around view components, for example. With Alpine.js, I can encapsulate UI behaviors easily within these components.
I encourage you to check out the repo for the demo app at https://github.com/Code-With-Rails/alpinejs-demo and see for yourself. Try and build the same interactions with Stimulus (or whatever lightweight framework you like to use) to compare. You might find that Alpine.js may provide the right amount of JavaScript for your needs.